Creating Analytics Experiences in Looker Studio
Steroids aren’t only for bodybuilders.
Think about: Web site analytics on steroids.
Utilizing Looker Studio (previously Google Information Studio) to construct a customized analytics report is like juicing up your most essential information that will help you monitor, perceive, and optimize your web site.
Looker Studio is extraordinarily highly effective, which implies it may also be a bit sophisticated.
However, for this information, we’ll begin with the fundamentals. Collectively, we’ll stroll by means of organising your first analytics report and beginning to customise it for you, your group, and your small business.
What’s a Google Analytics Report?
Google Analytics stories show, mix, and visualize key analytics information in a single dashboard to make it simpler for stakeholders to know and make choices. Utilizing information from Google Analytics (a web site analytics instrument for measuring and monitoring your web site’s visitors), an analytics report helps you perceive how many individuals are coming to your web site, the place they’re spending probably the most time, and the way shortly they go away your web site.
These stories can mix a number of sorts of information collectively, making it simpler to establish worthwhile insights, uncover tendencies, and benchmark KPIs from totally different date ranges.
Why Do You Want an Analytics Report?
Chances are you’ll ask, “What’s the purpose of constructing a dashboard if the info is already in Google Analytics?”
Truthful query.
And also you’re appropriate that the info you’re including to your analytics report may already be – technically – obtainable inside Google Analytics. However discovering the proper information, combining it with different related information, and figuring out tendencies just isn’t at all times simple or apparent. Plus, should you work with a group, different stakeholders could not perceive the way to learn and perceive the info from inside Google Analytics correctly.
Google Analytics
Google Analytics is an online analytics service provided by Google that tracks and stories web site visitors. It’s at present a program inside the Google Advertising and marketing Platform model.
Learn Extra
In different phrases, making a customized analytics report simply makes everybody’s life a bit simpler.
Constructing a Actual-Time Analytics Report in Looker Studio (Google Information Studio)
The best strategy to construct a real-time analytics report utilizing Google Analytics information is with Looker Studio.
This reporting instrument makes it extremely simple to construct insightful visualizations, charts, and graphs that present your key web site metrics and supply extra context than conventional reporting instruments.
Looker will pull the info out of your present Google Analytics account, format it, and show it in a dashboard. No different instruments required!
Better of all, constructing a fundamental report with Looker Studio is straightforward — You solely want two issues to get began:
- Google account
- Google Analytics put in in your web site
Step #1 – Select a Report Template
Looker Studio has a gallery of 100+ free report templates.
Every template is customizable however provides an ideal start line for working with Looker Studio. So earlier than we talk about constructing a customized report, let’s start with a template.
Browse the template library and click on on the one which greatest matches your wants.
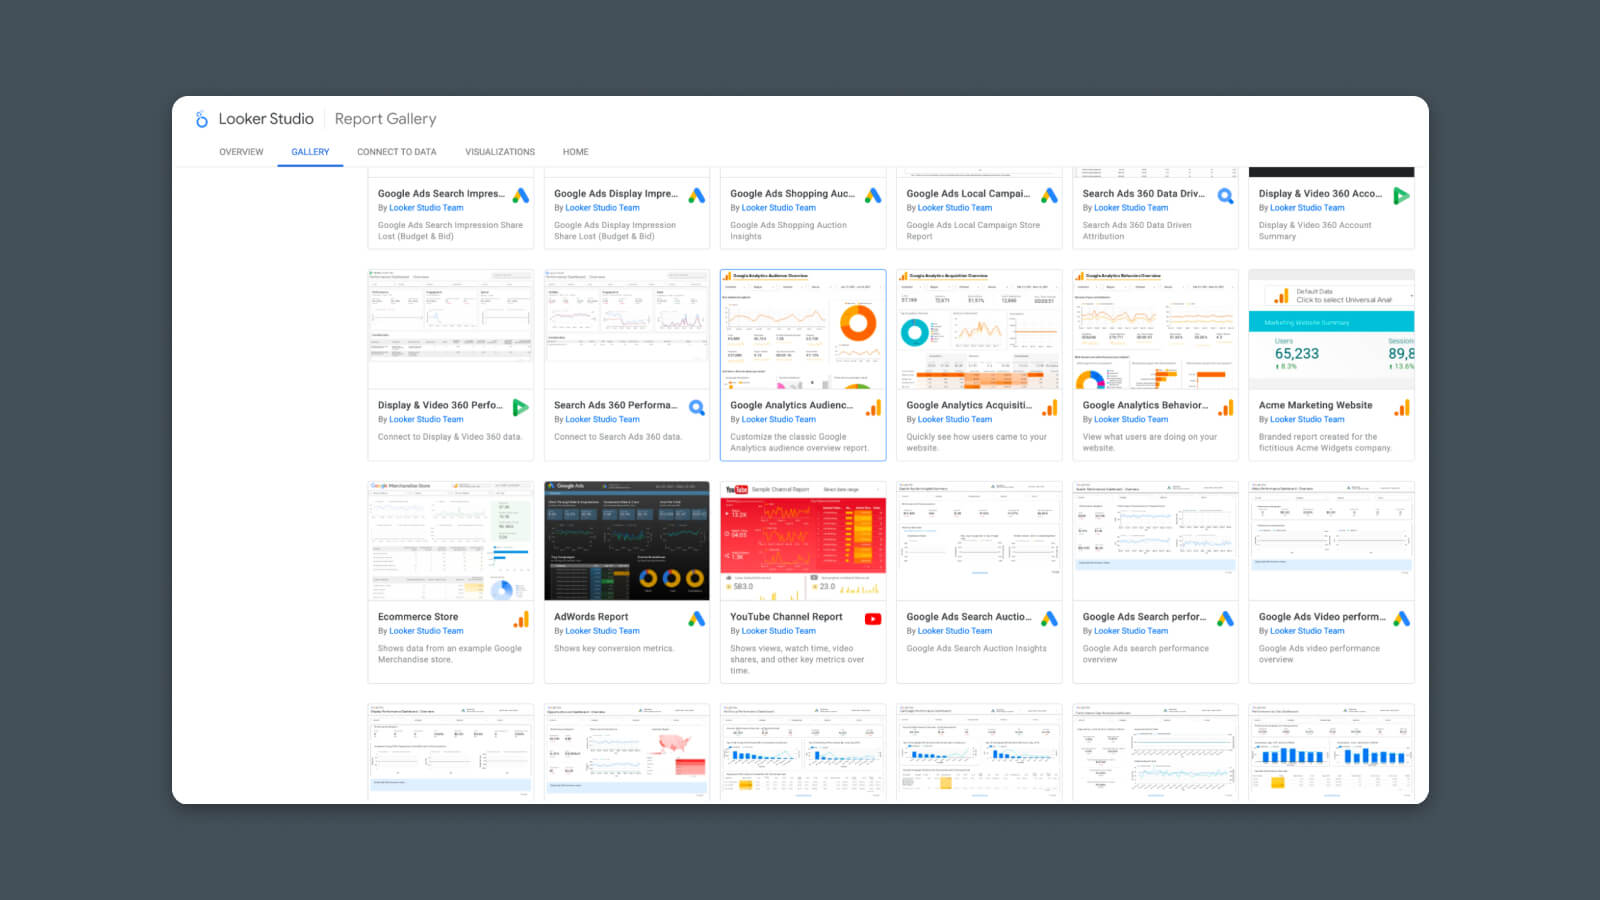
(Be aware: Some “Featured” templates are solely obtainable for buy.)
For this instance, I’m utilizing the Google Analytics Viewers report template.
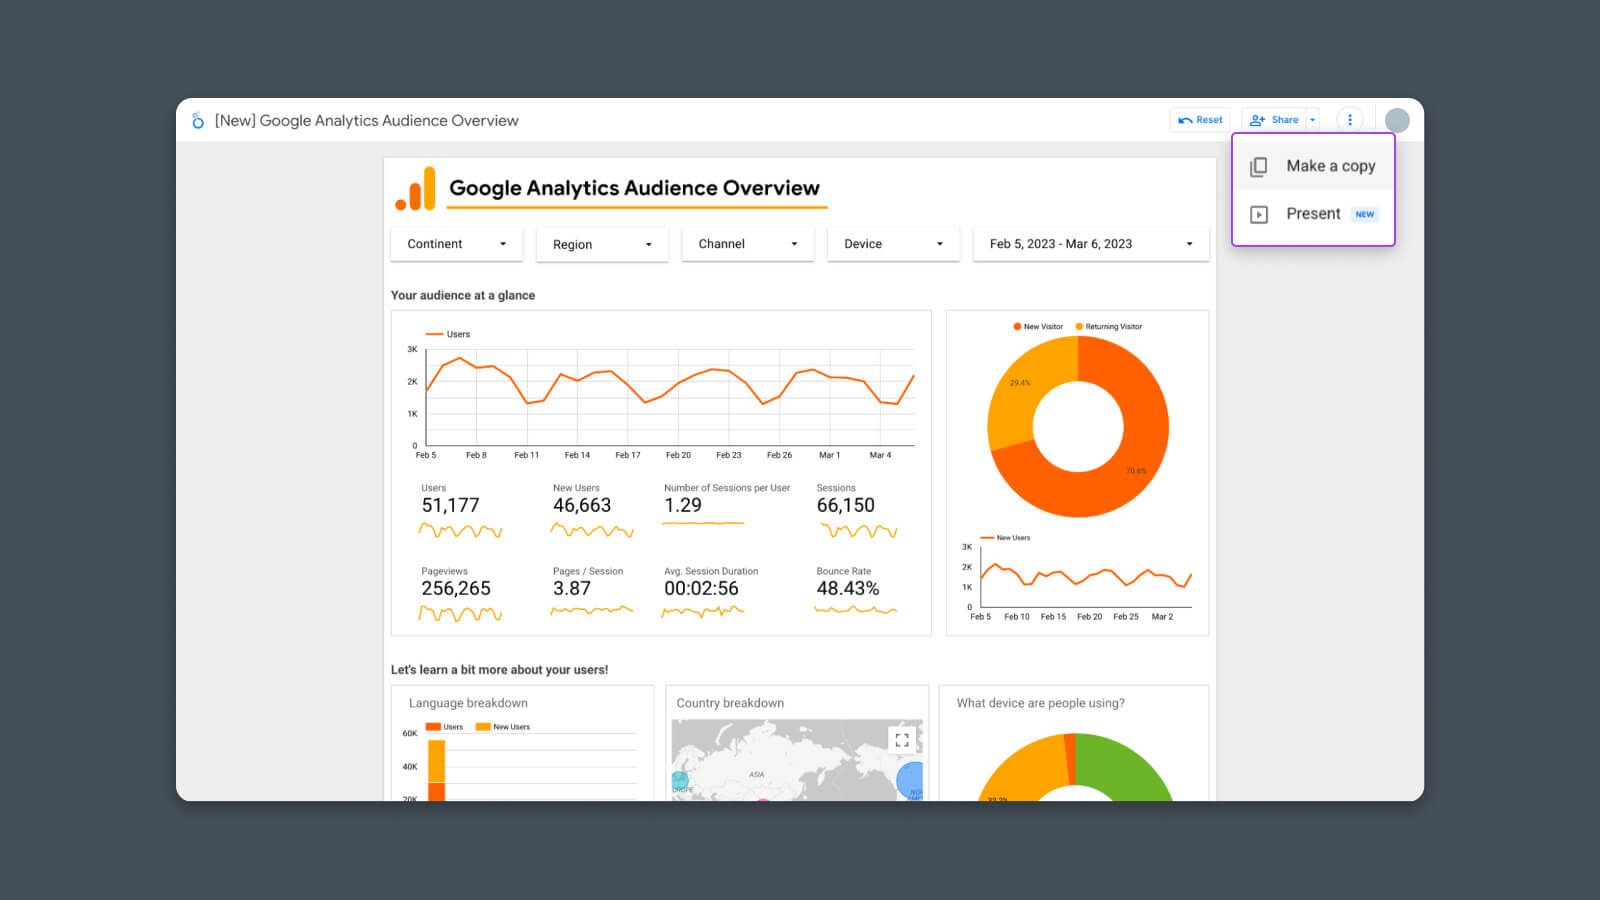
As soon as it’s opened, click on the “Use my very own information” possibility on the high.
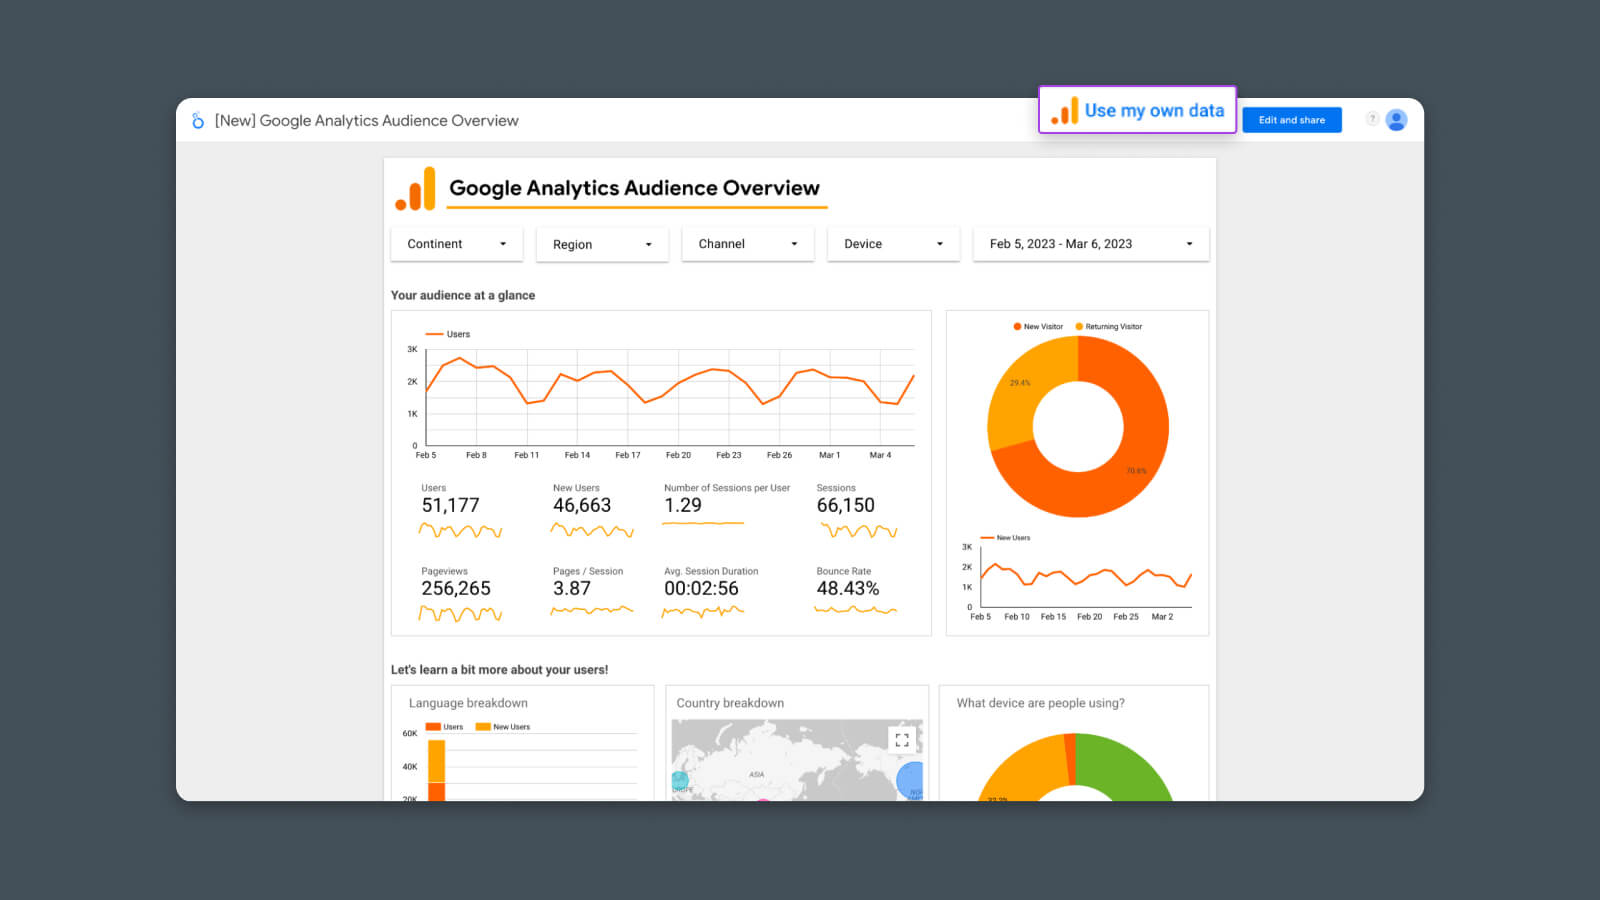
In some instances, you might not see this button. If it’s lacking, click on the 3-dot menu and choose “Make a replica”.
Step #2 – Join Your Information Sources
As quickly as you click on “Use my very own information,” it’s best to see a brand new display asking you to authorize Google Analytics entry for Looker Studio.
Click on the “Authorize” button.
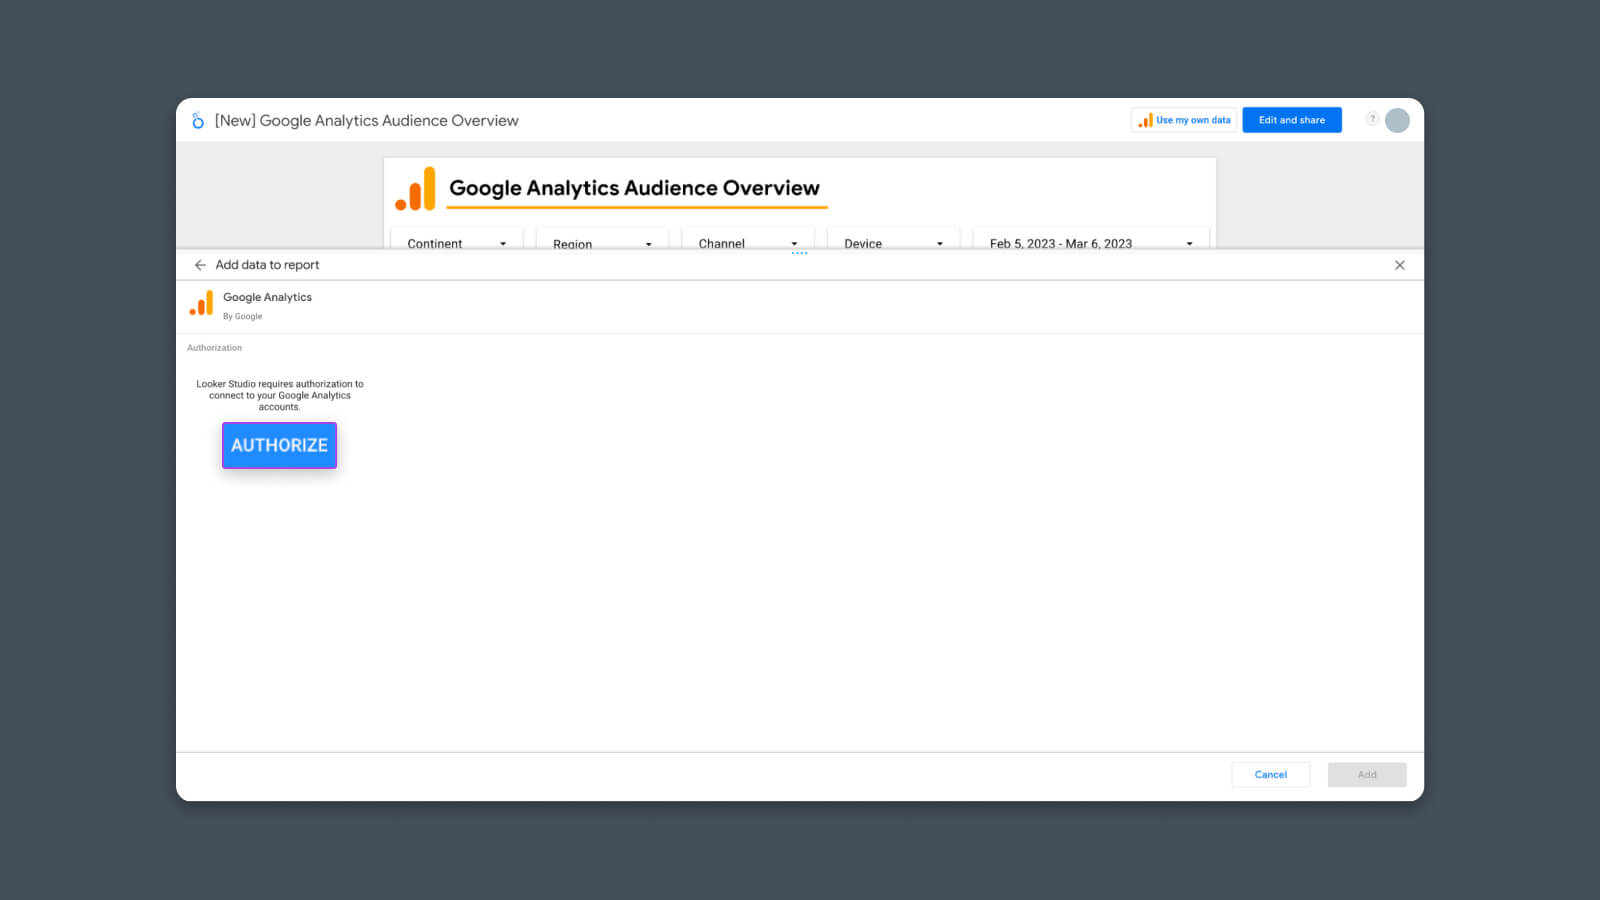
This permits Looker Studio to entry your analytics information.
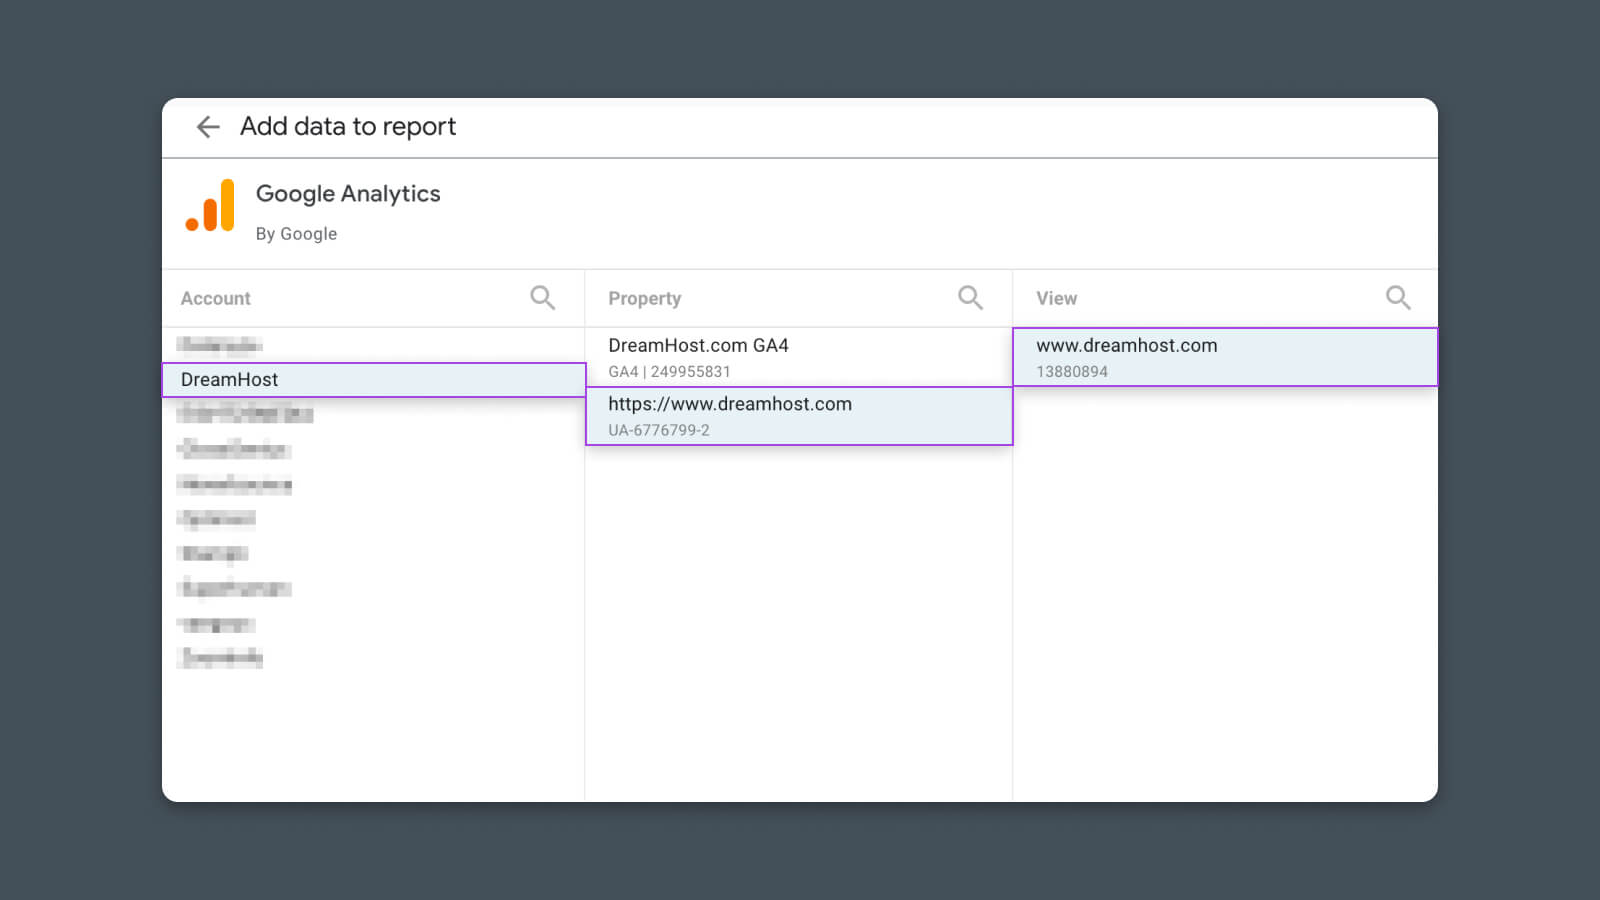
After you click on “Authorize” and ensure, it’s best to see a listing of your related Google Analytics accounts. Choose the Account, Property, and View that you just wish to use for this report.
Voila!
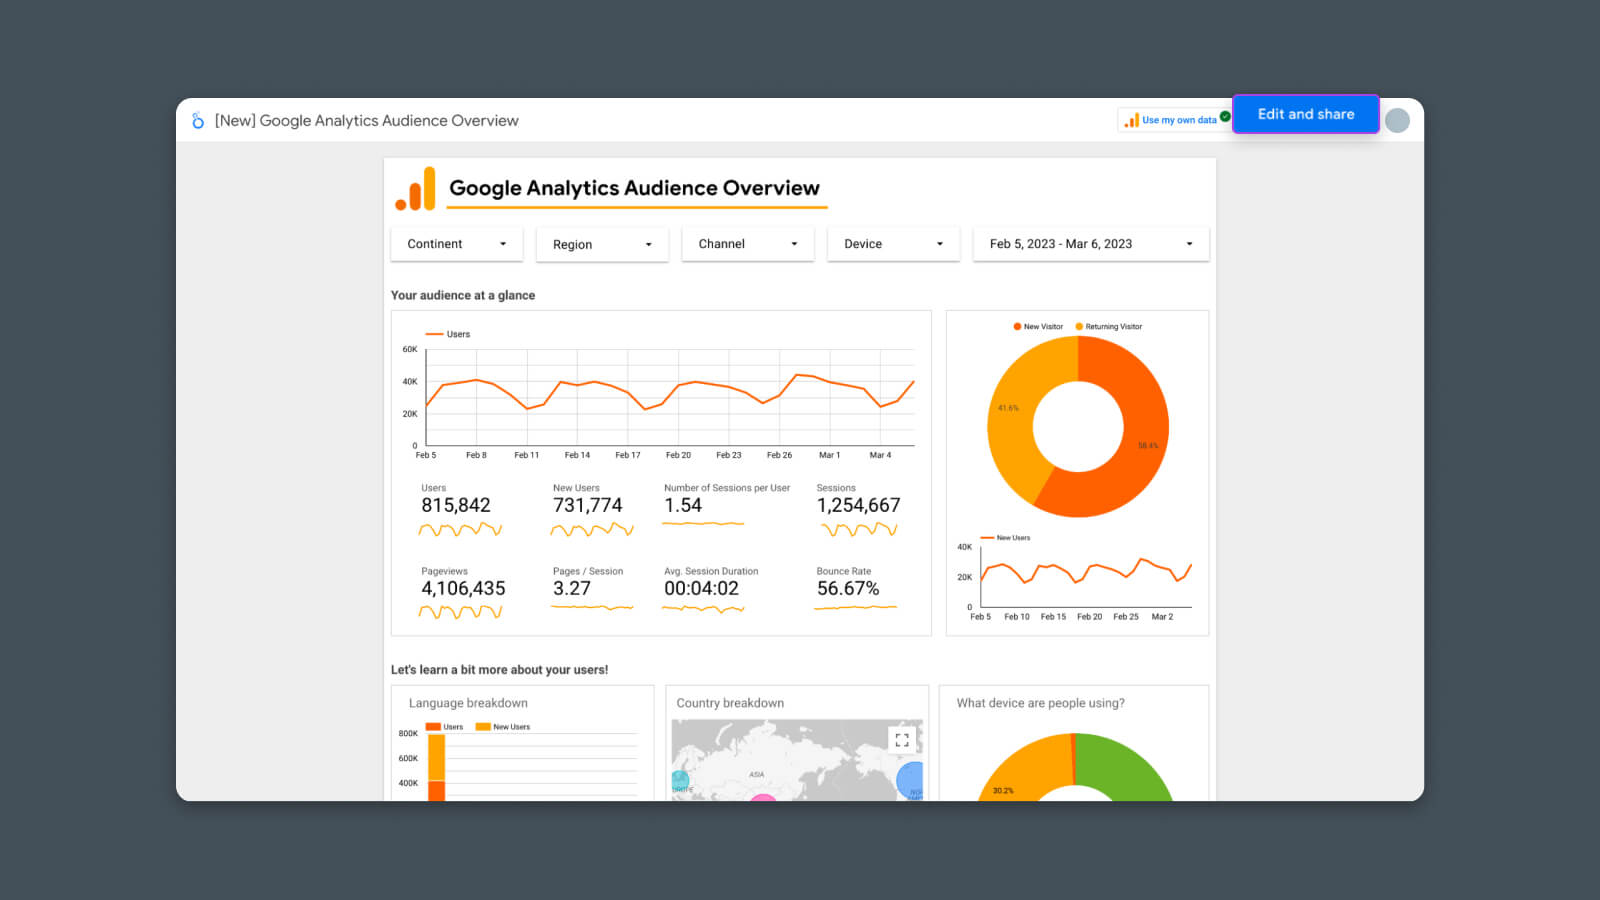
With that achieved, the report ought to refresh and show your information!
You’ve simply created your first Looker Studio analytics report! Take a second to soak within the glory.
Step #3 – Customise the Report
With the fundamental analytics report arrange, now we are able to take into consideration customization.
Begin by clicking “Edit and Share” within the high proper nook.
Now the report ought to refresh once more, and also you’ll discover that:
- It’s in “Edit” mode
- The report is now a “Copy”
From right here, you can begin to vary the report to higher suit your wants.
Methods you’ll be able to customise Looker Studio analytics stories:
- Change the format or design by transferring charts from one spot to a different
- Delete information that isn’t related to your use case
- Add new charts by clicking “Add chart”
- Add one other web page of knowledge by clicking “Add web page”
- Join extra analytics instruments by clicking “Add information” to show or mix metrics from a number of information sources (e.g., Google Search Console, Google Adverts, Google Sheets)
- Edit the prevailing charts and stories to vary the info they show and the way it seems
- Set the date vary for particular person charts to create static views or benchmarks
Get Content material Delivered Straight to Your Inbox
Subscribe to our weblog and obtain nice content material identical to this delivered straight to your inbox.
8 Analytics Dashboards for Monitoring Totally different Metrics & KPIs
The primary instance is simply the beginning.
Utilizing Looker Studio, you’ll be able to shortly and simply create analytics stories for nearly any use case, business, stakeholder, or marketing campaign.
Web site Guests and Visitors Conduct
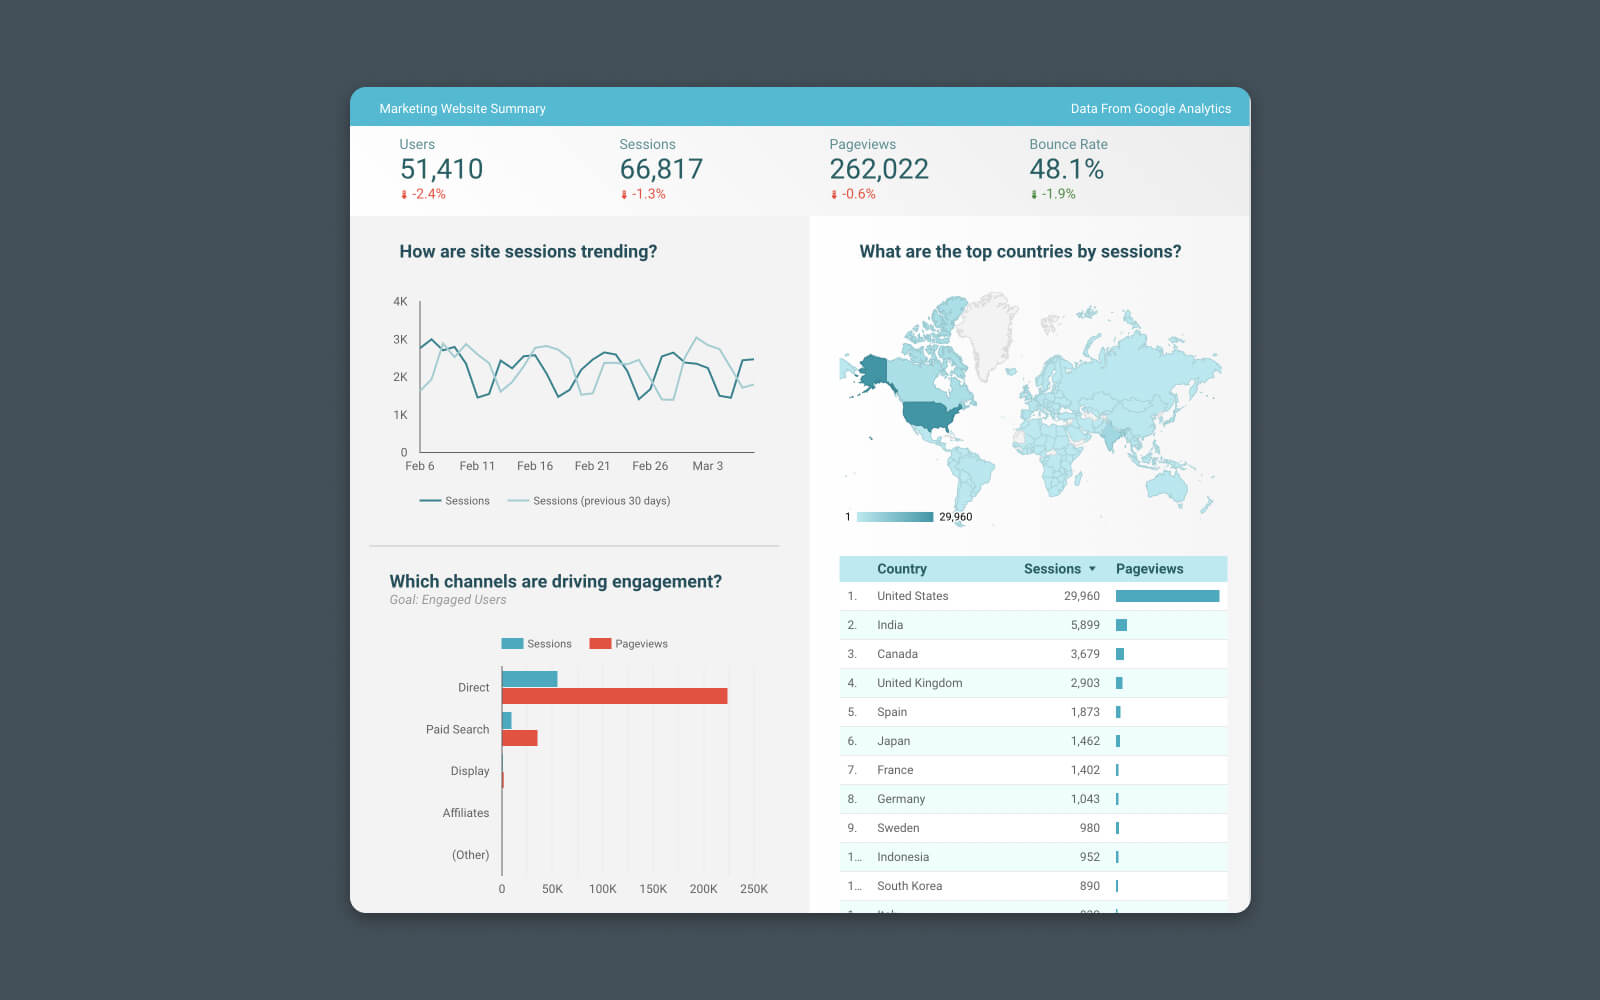
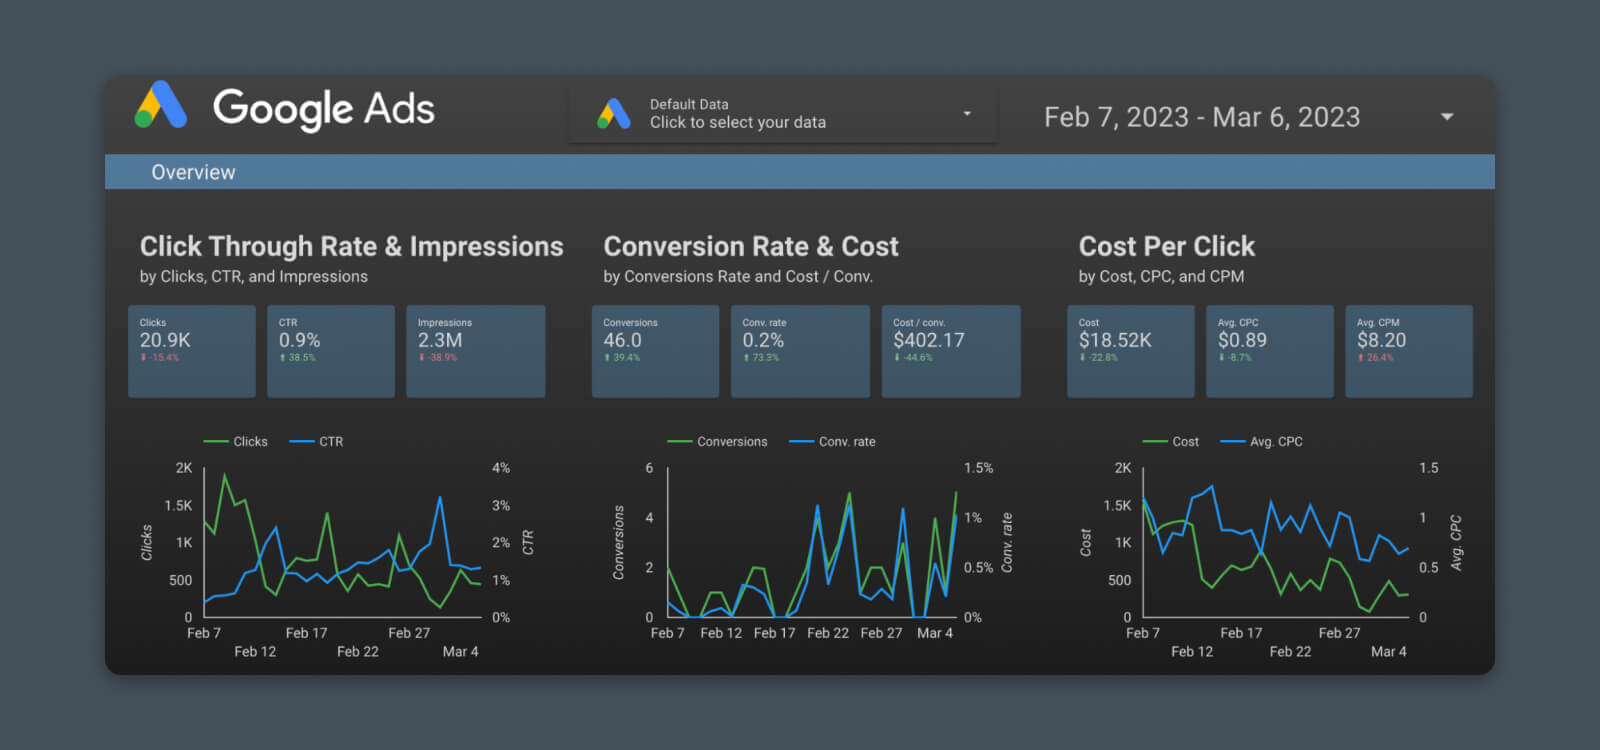
Higher perceive how folks use your web site by constructing dashboards that present important metrics for the success of your web site or weblog.
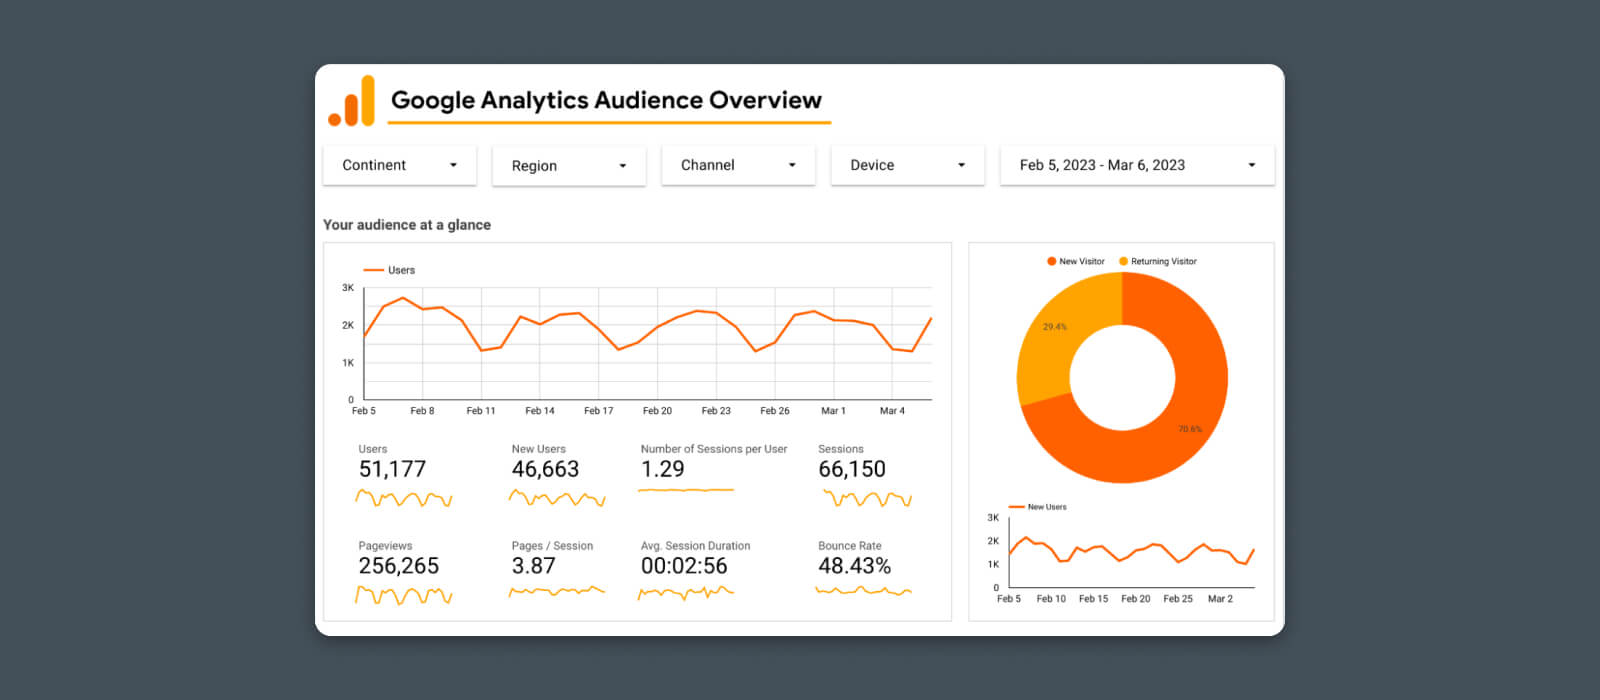
Get a real-time, at-a-glance take a look at how many individuals discover your web site, how typically they’re returning, and the way shortly your web site is rising in recognition.
This report contains these metrics:
- General web site visitors
- Web page view numbers
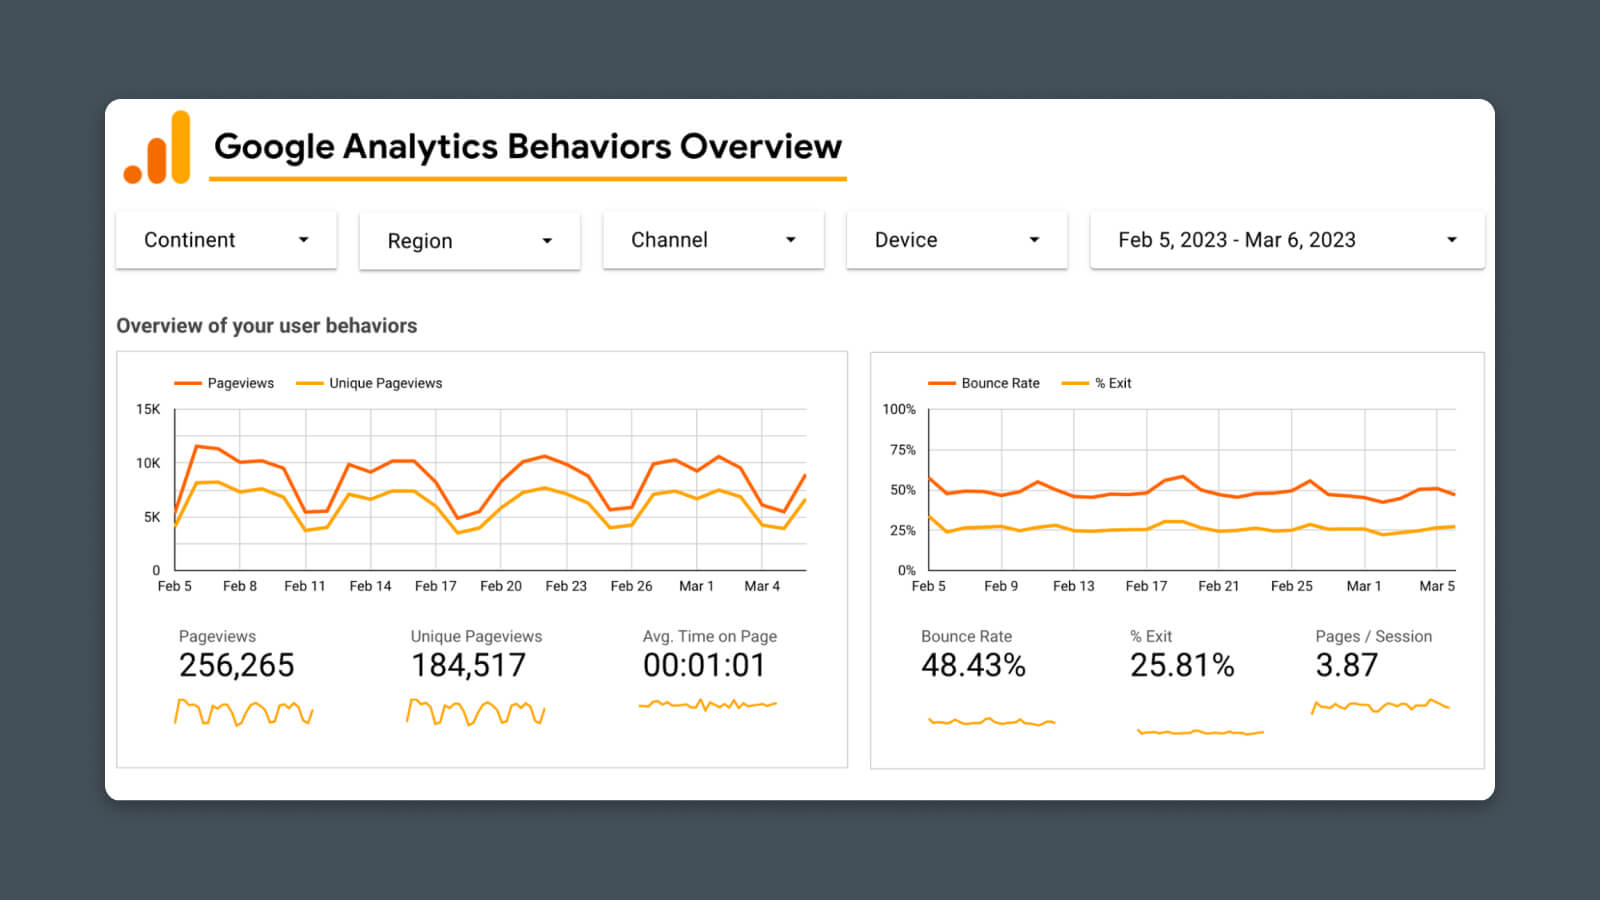
Assess the performance of your web site by constructing a dashboard for essential UX metrics like:
- Session period
- Bounce charge
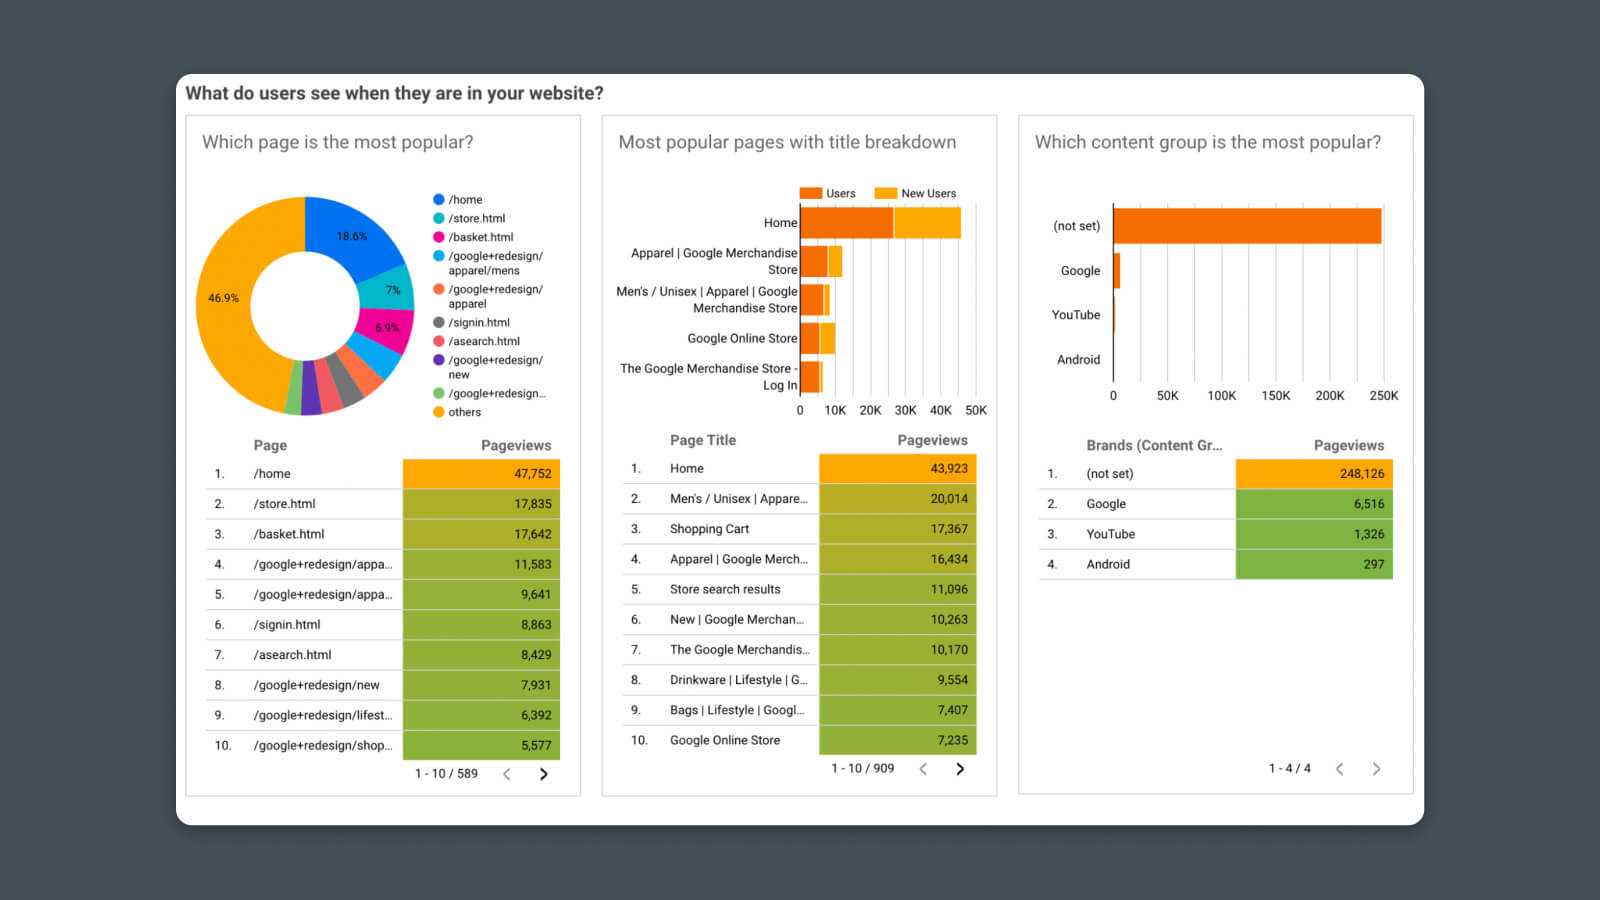
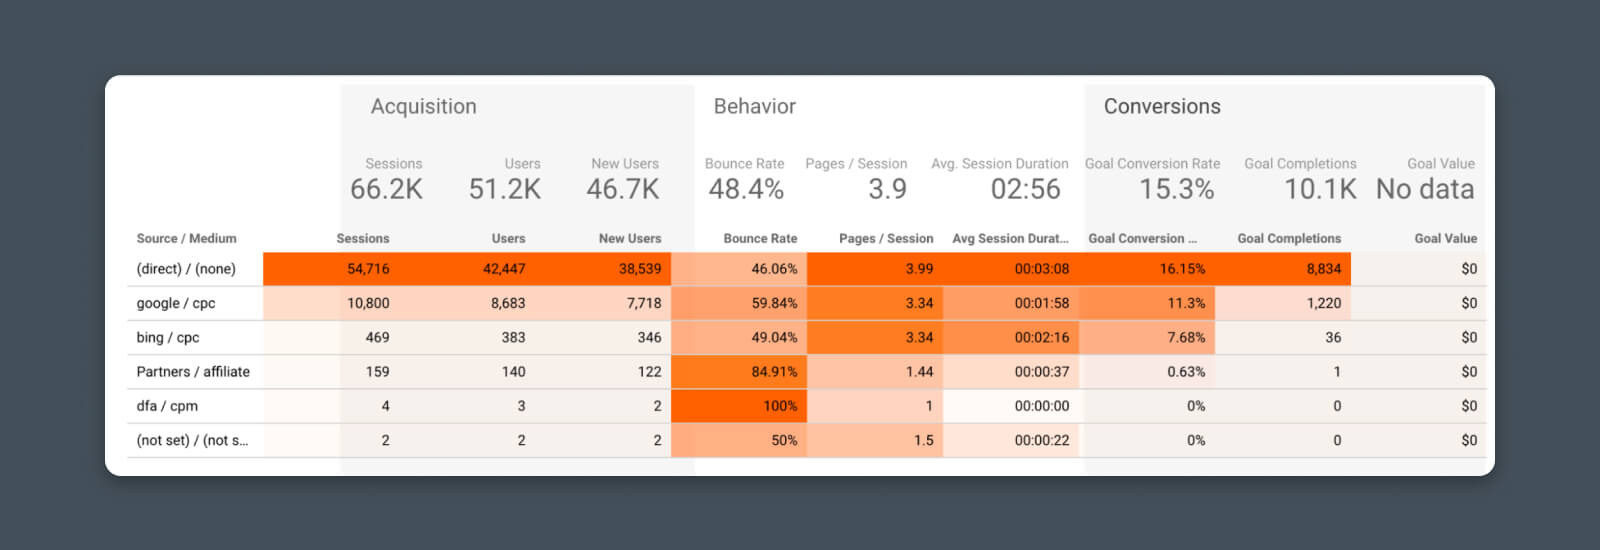
Higher perceive how customers discover your web site and navigate it. Trying deeper into the habits report, we are able to see the preferred content material and interactions.
- Website content material information (visitors to particular net pages)
- Touchdown web page stories
Visitors Sources, Acquisition, and Advertising and marketing
As soon as you understand how a lot web site visitors you’re receiving, then you definately’ll most likely wish to understand how customers are discovering out about your web site within the first place.
You possibly can create customized analytics stories to trace your visitors sources and advertising channels utilizing Google Analytics and different sources.
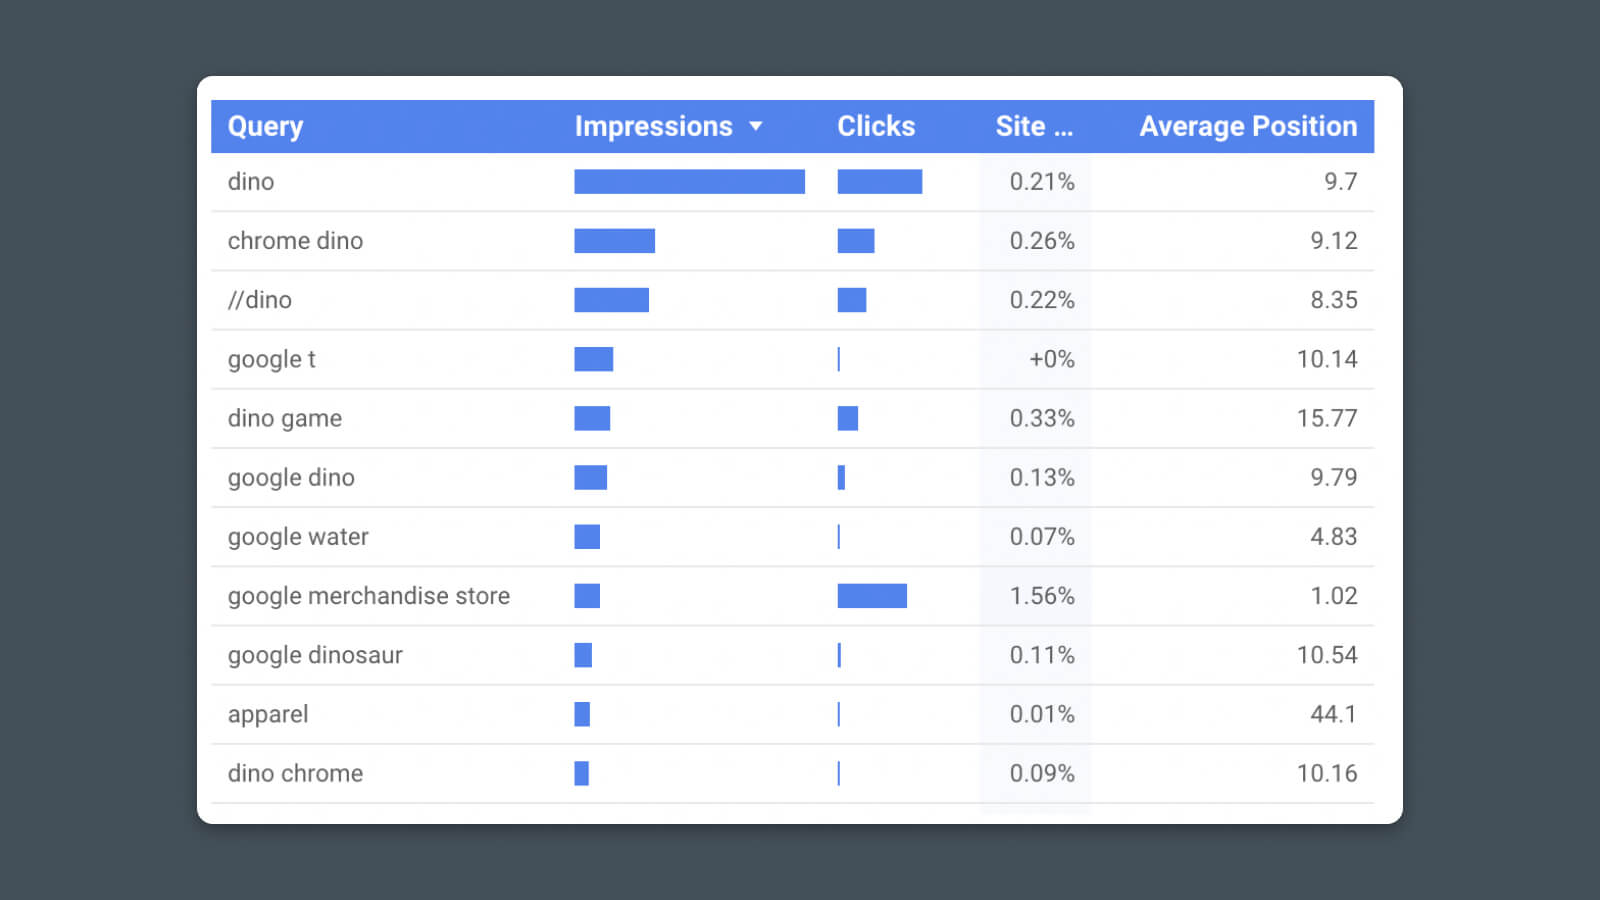
See how a lot visitors you obtain from engines like google like Google and which pages carry out greatest in search. This report template makes use of information from Google Search Console.
Click on-By Price (CTR)
Click on-By Price (CTR) refers back to the share of customers that click on on a particular hyperlink. Ideally, you need as many customers as potential to click on on URLs resulting in your web site or to the services you’re selling.
Learn Extra
Metrics:
- Search impressions
- Clicks per web page
- Click on-through charge (impressions/clicks)
- Rating (place) for essential key phrases
Observe the efficiency of your promoting campaigns. Whether or not it’s Google Adverts (PPC), or the newest billboard you place up on Route 66, with the proper monitoring, you’ll be able to see precisely how your advert {dollars} are working for you.
Metrics:
- Visitors and visits
- Click on-through charges and advert impressions
- Value per click on (CPC)
- Conversion charges and price per conversion
6. Marketing Dashboard
Determine whether or not all these advertising efforts are paying off with a advertising dashboard. View a snapshot of visitors out of your digital advertising channels, content material advertising, social media, and extra.
- Visitors by channel
- Referral visitors from different web sites
Conversion Efficiency
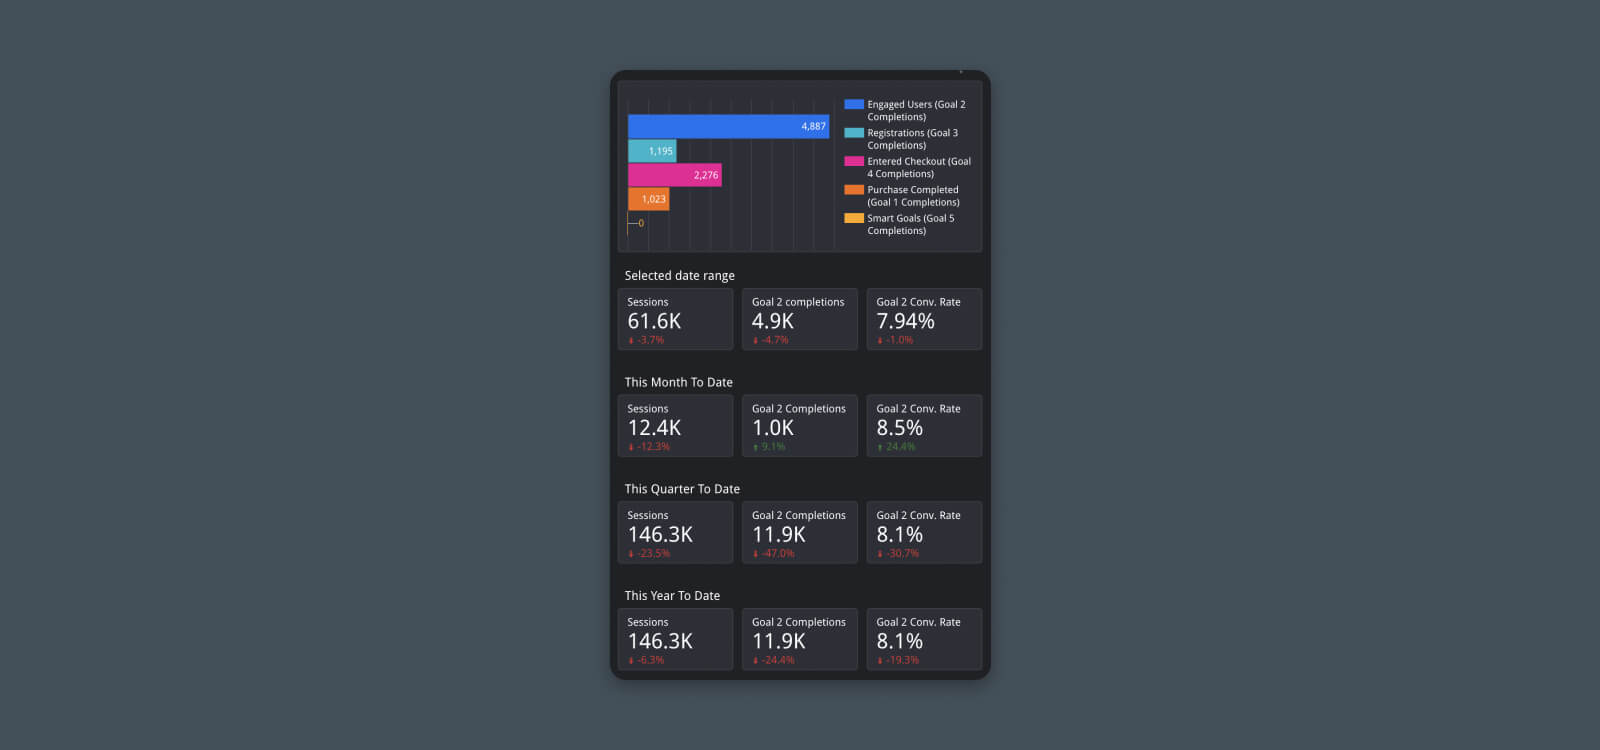
The buck stops right here. Drill down into the efficiency of your web site to higher perceive income attribution, conversion charges, and extra.
Metrics:
- Purpose completions
- Purpose conversions
- Conversion charge
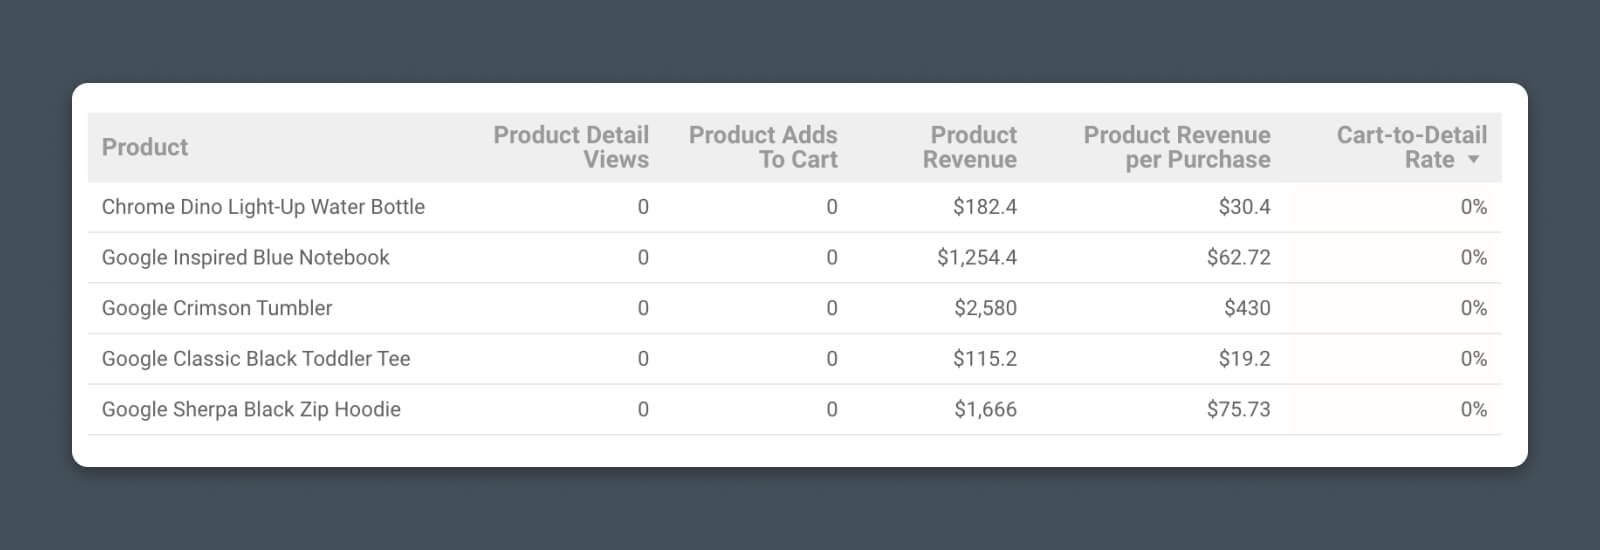
Whether or not you’re promoting widgets or wool coats, you’ll be able to pipe information from Analytics and e-commerce platforms to trace key enterprise efficiency:
- Product gross sales and income
- Product conversion charges
- Buying and add-to-cart information
(Bonus) Making a Customized Looker Studio Analytics Report
Okay, you requested for it.
We’ll go one step past the fundamental report and present you, step-by-step, the way to create a customized chart from scratch and add it to your analytics report.
When you’ve mastered this course of, you’ll mainly be unstoppable with Looker Studio.
Step #1 – Join Information Supply
We start by including a brand new web page to my Looker Studio report (Web page > New Web page), however you may also comply with the steps so as to add a brand new chart to an present web page.
Upon getting the web page the place you wish to add information, you’ll want to attach your information supply. This may be Google Analytics, Google Search Console, Google Adverts, Sheets, or numerous different sources.
Click on “Add information” and choose your information supply.
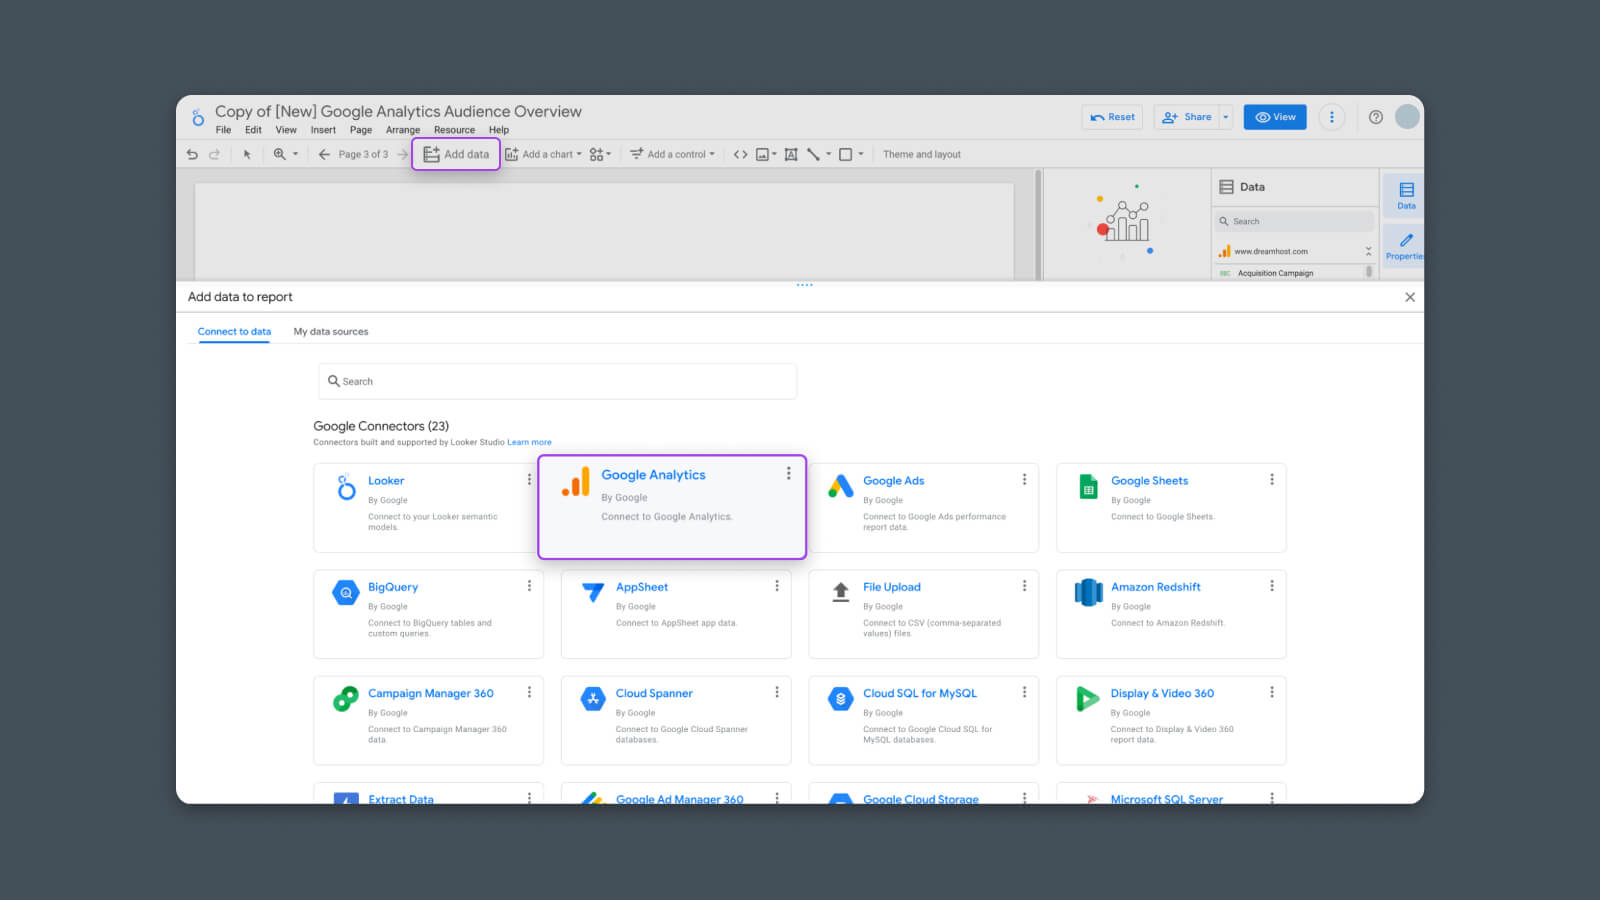
I’ll use Google Analytics for this instance.
As soon as you choose your information supply, it is going to ask you to connect with Looker Studio and allow permissions. Observe the prompts to log in or authorize accordingly.
Step #2 – Select the Appropriate Chart Kind
Now that Looker Studio can entry the info supply, we are able to select how we wish to show the info.
Click on “Add chart”.
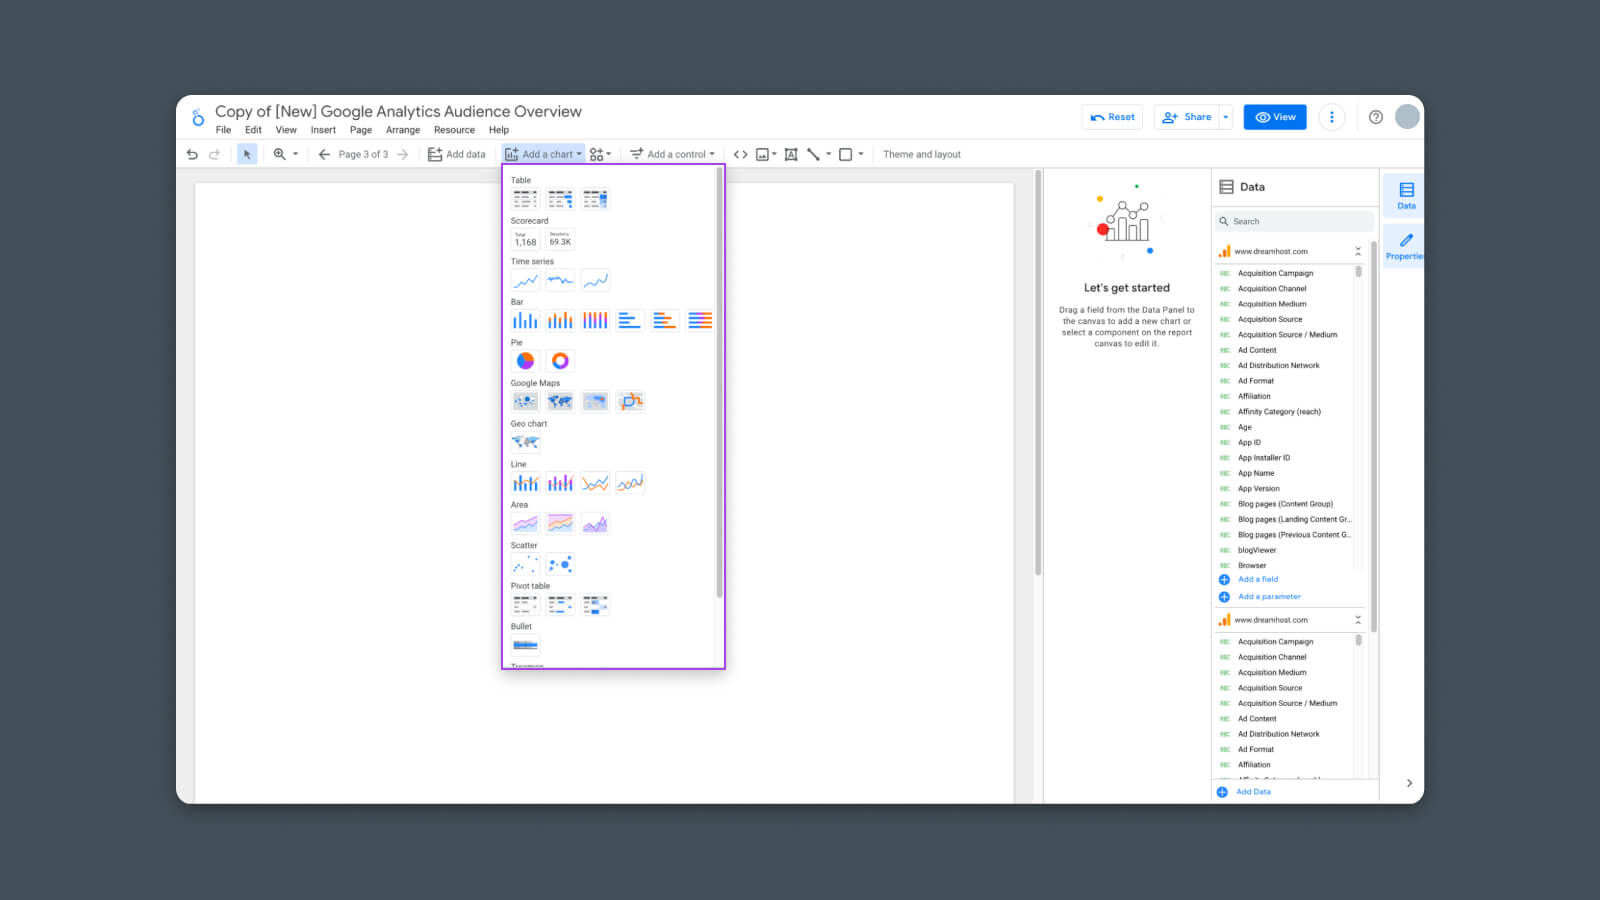
Right here, you’ll see a listing of chart choices.
(I’m utilizing “chart” as a broad time period. Looker Studio considers tables, standalone stats, and the whole lot else a sort of “chart.”)
Select the sort of chart that you just wish to add to the report.
- Desk – Plain-text desk for evaluating a snapshot of a number of dimensions and metrics
- Scorecard – Plain-text stat for highlighting top-line KPIs
- Time Collection – Chart for monitoring 1-3 metrics over a time frame
- Bar – Chart for evaluating relative quantities or sizes of a number of metrics
- Pie – Chart for displaying which dimensions comprise an entire metric
For this instance, I’m going to decide on a Time Collection.
As soon as you choose the chart sort, you’ll be able to click on wherever on the web page so as to add it.
Step #3 – Configure Chart Information Supply
Subsequent, you could configure the chart to tug information from the supply you simply added.
Click on on the chart, and within the right-hand sidebar it’s best to see a piece known as “Information Supply”.
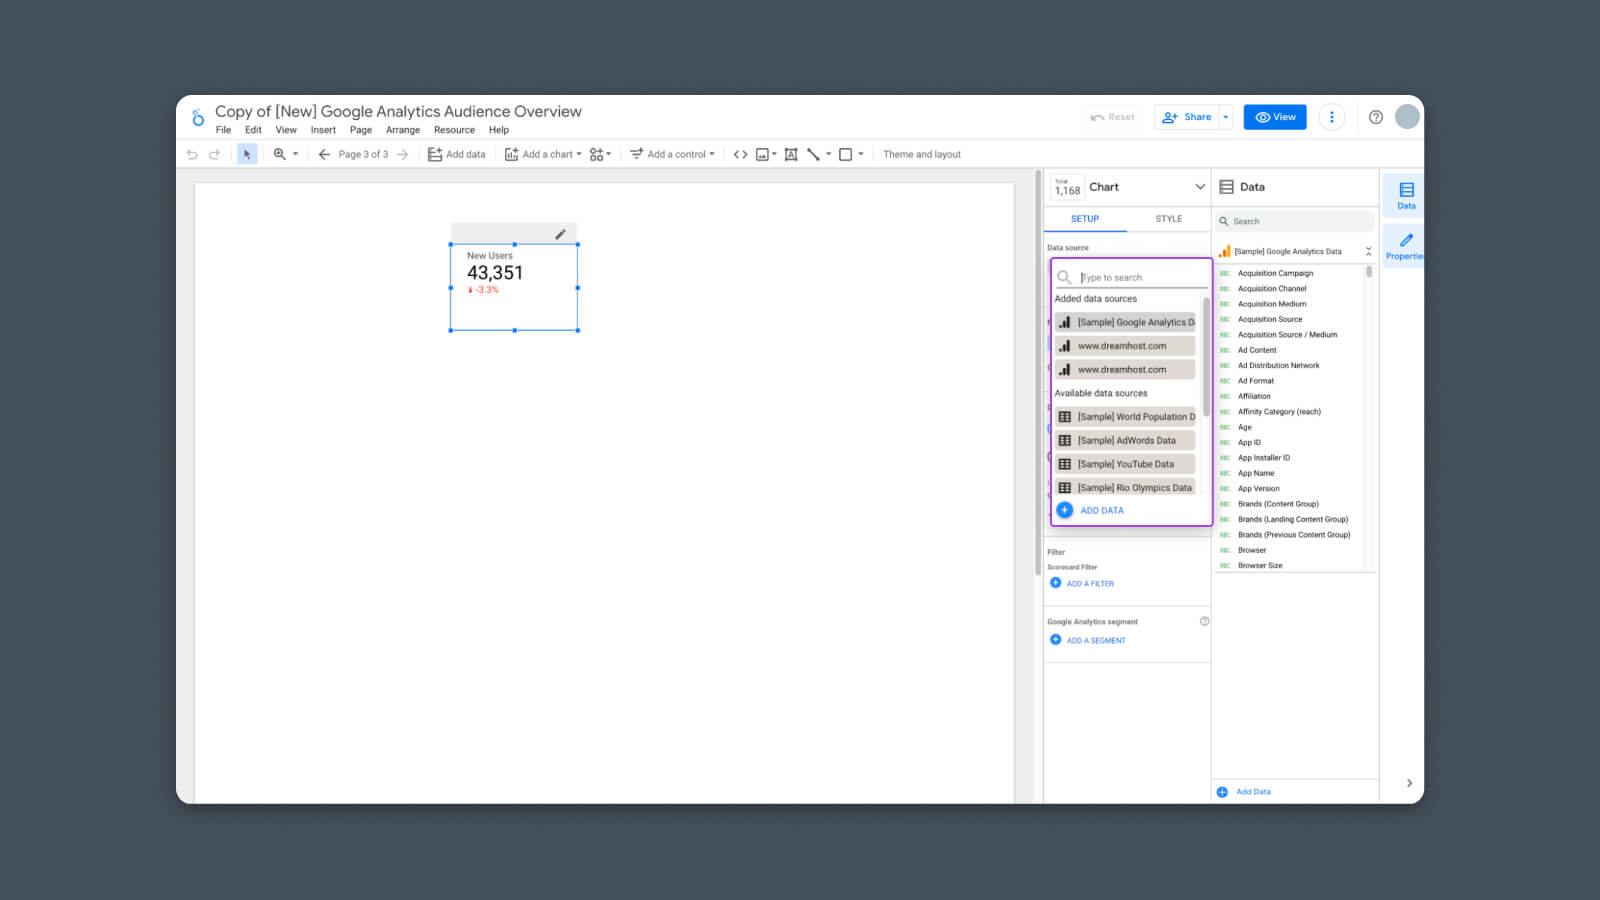
Click on on the grey field to pick out any information sources you’ve added to this report.
Step #4 – Configure Chart Dimensions
Subsequent, select the scale you wish to show.
Dimensions are the way in which we would like the info to be segmented. For example, we could wish to show the info by date in a Time Collection, or we could wish to section the info by Supply if we’re making a Desk of our visitors from numerous advertising efforts.
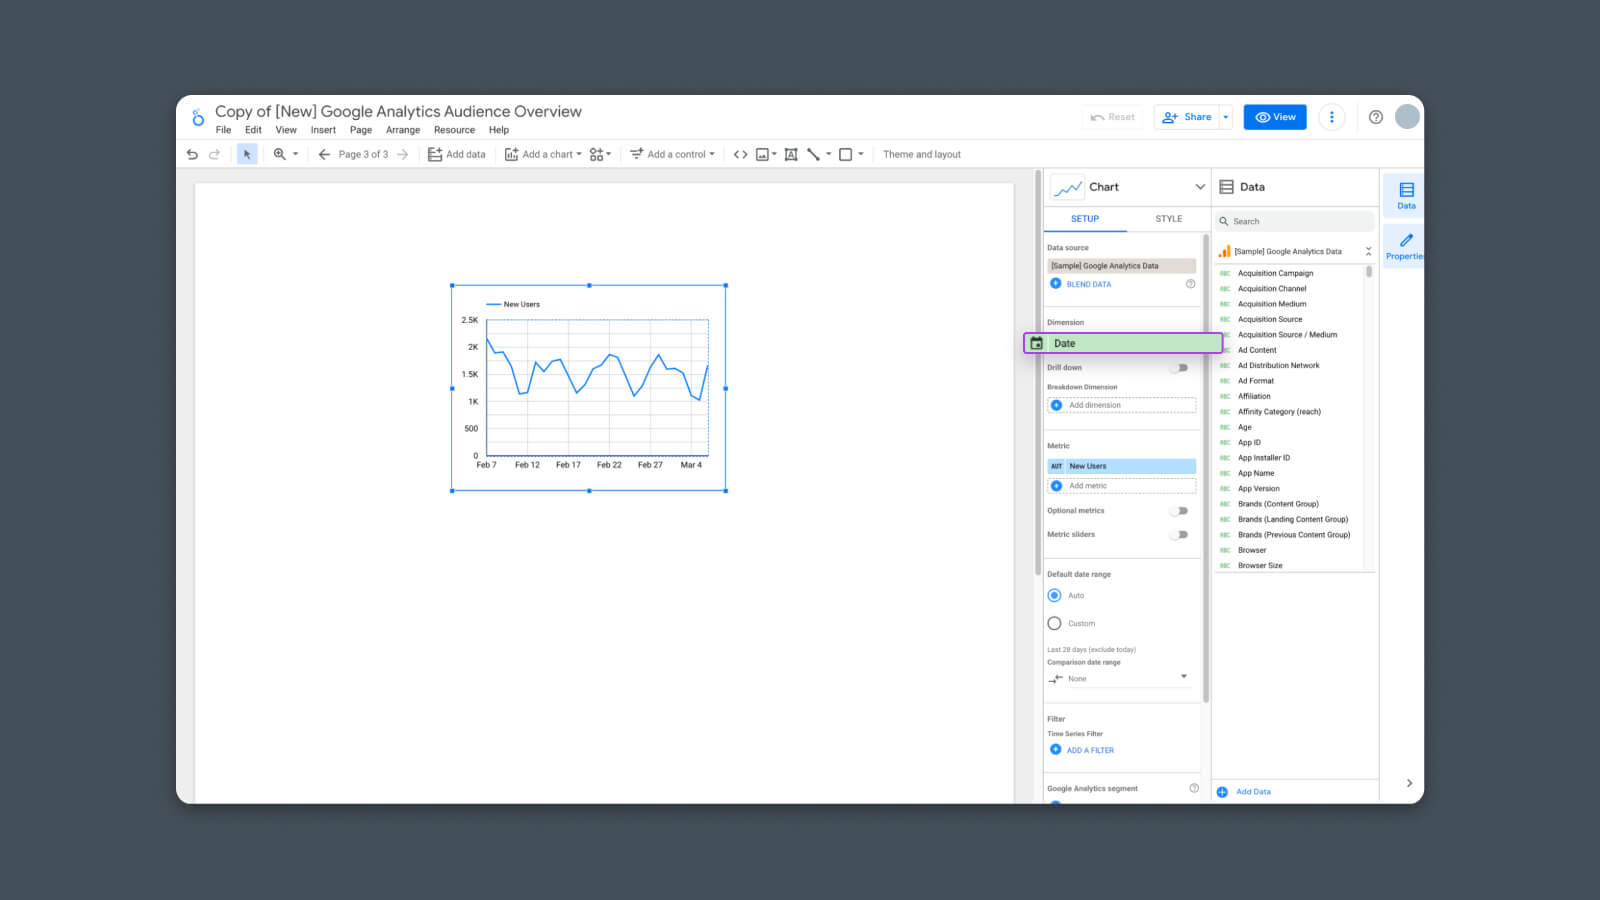
Looker Studio will present related dimensions relying on which sort of chart you’ve chosen.
Since I’m utilizing a Time Collection, I’ll select “Date” as my one and solely dimension.
Step #5 – Configure Chart Metrics
As soon as we’ve chosen the info dimensions, we are able to now choose the metrics.
Metrics are the precise information factors we would like the report to indicate. It may very well be issues like Classes, Conversions, Time on Web page, or another numerical worth. You possibly can add a number of Metrics to check them in the identical chart.

In my instance, I selected to indicate each Customers and New Customers. You possibly can see within the chart that there are actually two traces evaluating these two metrics versus the chosen dimension (Date).
And now the chart is completed — It’s displaying the info that I’ve chosen.
However we are able to go one step additional.
Step #6 – Configure Comparability (Optionally available)
As an elective step, you may also examine the info right here with information from a earlier interval. For example, if you wish to see how this month’s efficiency compares to final month’s.
To do that, merely discover the choice within the right-hand sidebar that claims “Comparability date vary”.
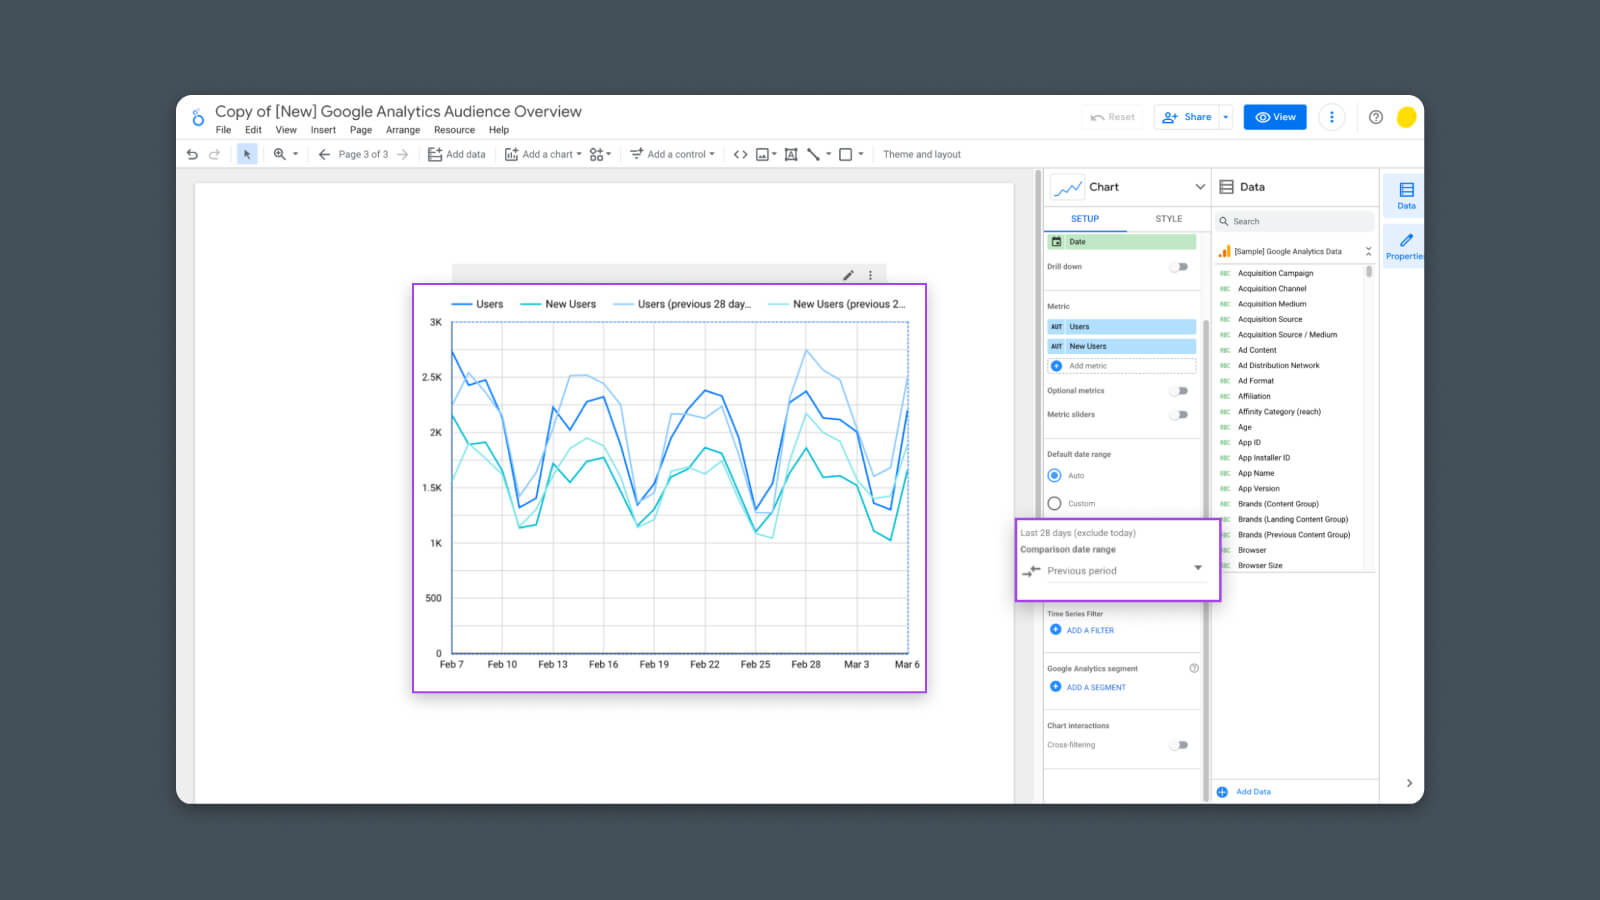
Open the drop-down to decide on the earlier dates you wish to examine.
Selecting “Earlier Interval” is an effective default possibility that may present you an apples-to-apples view of knowledge from this present time interval (which defaults to the final 28 days) versus the earlier time interval (prior to twenty-eight days).
Now, there you could have it — It’s a model new, built-from-scratch chart!
A Ultimate Be aware: Google Analytics 4 is Nigh
As we’re penning this, Google Analytics 4 is about to exchange the present model of Google Analytics (Common Analytics or “UA”).
However one factor it’s best to know for this information: any report templates that use Common Analytics will not work with GA4 information. Bummer, I do know.
A lot of the present GA4 templates price cash, however just a few examples, just like the one from Metricized, are free along with your electronic mail deal with.
We’ll proceed to replace this publish sooner or later when there are extra GA4 templates and stories obtainable.
Armed with these new abilities, it’s best to be capable of create and showcase any information you could provide help to run your web site with the precision of a heart-surgeon-turned-website-owner. For now, go forth and construct the stories of your desires. (Or your boss’s desires.)
Develop with Confidence
Our advertising specialists may also help you construct excellent stories and dashboards for your small business.